Audio Upgrade Guide, Part 7: Separation Anxiety

PART 7: Separation Anxiety
a.k.a. How an Active Front Stage Can Be the Best or Worst Thing to Have.
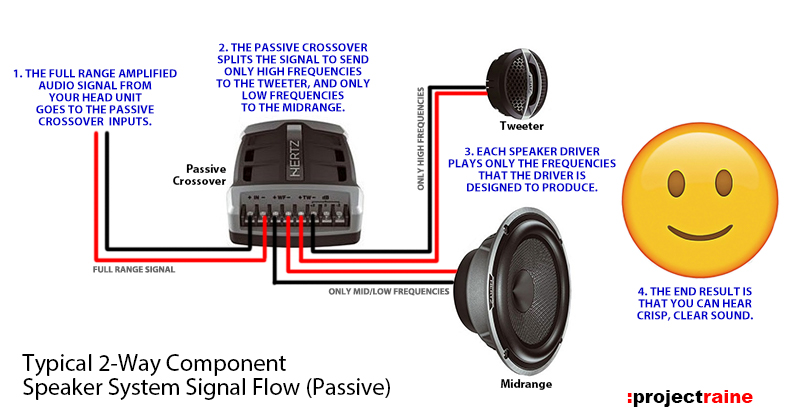
Before we get into it, let’s refresh: a typical “2-way passive component system” is simply a set of two speaker drivers (usually a small tweeter and a larger midrange) designed to work together to produce one channel of audio. There are even more complicated 3-way component systems available, but let’s keep it simple. In a 2-way component system, you get two speaker drivers, and each speaker driver is designed to play a different and specific range of the frequency spectrum. The frequencies played by each driver are specified either by a built-in filter on the driver itself or a separate passive crossover which is simply a circuit board inside a small box that houses the inductors and capacitors that filter the full-range signal flowing in from your head unit. After amplification, the passive crossover splits the signal into two separate pairs of terminals (thus “2-way”) and is sent to each of the drivers. Note that the passive crossover does its job after the signal has already been amplified.
The Frontier is Already… Ready
Our beloved, D40 Nissan Frontier comes from the factory already equipped to install a true front component speaker system without custom modding, thanks to the designers at Nissan giving us two separate speaker locations on each side of the front cabin. Thanks to this, the typical upgrade path here is to swap out the OEM front dash and door speakers with a matched set of two-way components. The simplicity of upgrading to a typical 2-way passive component system is easy to see – the crossover points are preset. The frequency ranges are already worked out by the speaker manufacturer. And, you get to use 2 different speakers designed to play 2 separate frequency ranges out of 1 channel from your head unit! All you have to do is to find a spot for the passive crossover and connect some wires. Likewise, there are so many aftermarket component systems available that can easily be installed into our Frontiers; the dash locations can accommodate up to a 2.75″ diameter driver (although most component tweeters are usually in the 1-1.5″ range), and the doors can hold almost anything from a 5.25″, to the most common 6.5″, up to a 6×9″ midrange. Because we have a wide selection of sizing to choose from, anyone can get a nice, complete component speaker system (two tweeters, two midrange drivers, and two matching passive crossovers) at virtually any budget. You can spend as low as $60 for a basic, brand-name component system all the way up to 4 digits if you really want the cream of the crop.
Wasting Power That You Paid For
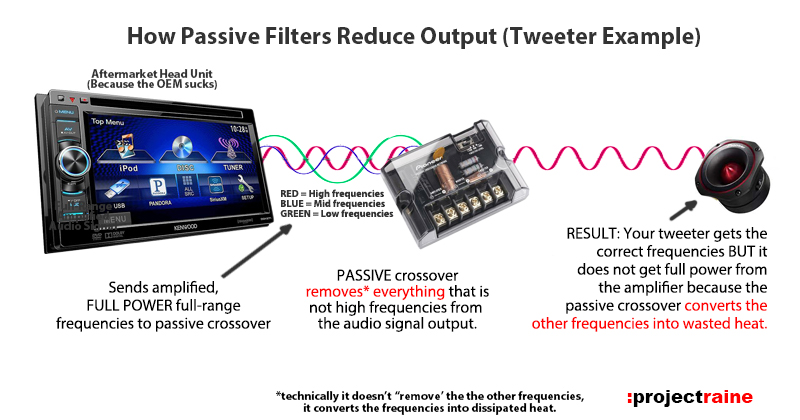
Let’s bring it back to Earth – after going over all that is good with a passive component speaker system, there has to be some bad stuff too, right? Of course, there is. First of all, passive crossovers are just filters – so they reduce the final output (loudness) of your music. The easiest way to explain this is by looking at what those useless colored overlays/films (the stuff people put on their white fog lamps to make them amber) actually do – take a look at this:

Starting with white light, amplifying it, and then using a colored film afterward is such a waste of power and energy. Your colored film is not changing all of the white light output to amber, it’s just removing all of the other light that isn’t amber. Removing light means less light output – and the same happens with passive crossovers. The same idea presented in the fog lamp example above can be used in car audio when talking about passive crossovers:
Not Much of a Choice to Tune
Second, you are probably going to be stuck with preset crossover points and tweeter attenuation levels that the manufacturer gives you when you buy a passive component set. Most passive crossovers have one set frequency where it splits the audio signal; some higher-end component systems might give you the ability to move a jumper to change to some other preset crossover frequency, but still – what they give you is only what you get. Again, because the manufacturer does not know ahead of time what vehicle you have, they, in turn, will choose an all-around “general” crossover frequency point that is adequate for the speakers, but not necessarily ideal for certain vehicles.
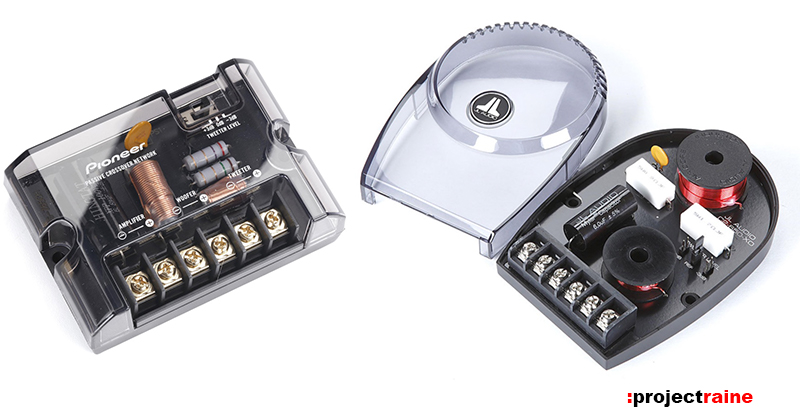
Likewise, in most passive component systems there is no precise way for you to control how loud each driver plays music relative to the speaker location. You might have noticed that some mid-level and higher passive crossovers (like the Pioneer crossover shown above) have a “Tweeter Level” switch. This switch will reduce the output of the tweeter relative to the midrange to give you some small control, but not much because the attenuation is also at preset levels. (Fun Fact: if you have a passive crossover that claims to give you “+3db/0-db/-3db” tweeter level settings…they are lying! Because passive crossovers do not increase a speaker’s output (that’s what an amplifier does), that “+3db” setting printed on the passive crossover is actually 0db, the “0” is actually -3db, and the “-3db” is actually -6db!)
Hey… Oh, You Own a Nissan Frontier?
Remember that upgrading and tuning mobile audio will first and foremost always be on a case-by-case basis. There are so many variables involved in mobile audio, not limited to vehicle type, passenger compartment size, type of music being played, amount of amplifier power, physical speaker locations, and even direction of speaker output. The last two are important in this discussion because the Frontier has some quirks to its OEM front speaker locations. First, take a look at the actual speaker locations of your Frontier:
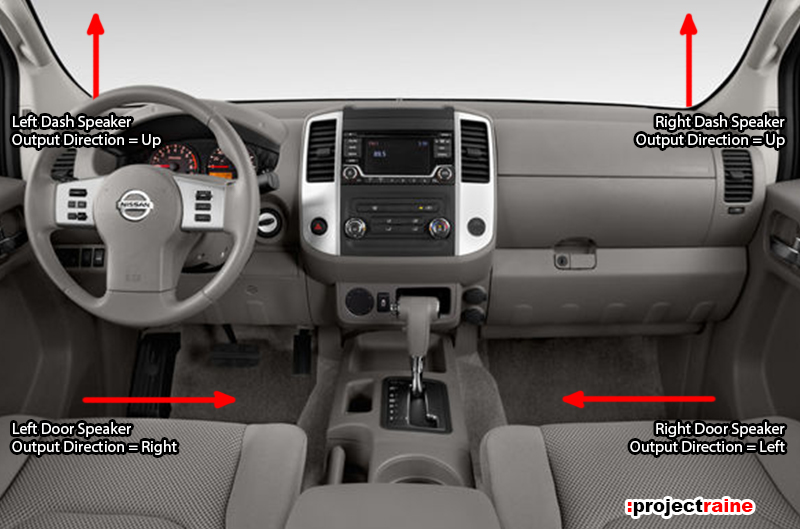
As a quick experiment, take a tape measure and measure the distance from the center of each speaker to the center of the driver’s side headrest. Note the distances, and you will discover just how uneven each speaker location in our Frontiers is relative to where you are listening from! For example, if you were to measure the distance from each front speaker to the center of your head (which you know, is right in the middle of your two ears) you’ll find that the Frontiers’ left-front dash speaker is farther from your ears than the left-front door speaker… however the right-front dash speaker is closer to your ears compared to the right-front door speaker! And just to reinforce this, if you also measure the distance to the rear door speakers (rear fill) the left-rear coaxial is the closest speaker of all (but it’s behind you!) and the right-rear coaxial is 2/3 farther away. In other words, all of the distances are different.
But wait – there’s more! Now look at the speaker directions: notice that the dash speakers project all of their sounds upward towards the windshield, and the door speakers project all of their sounds laterally towards the center transmission hump! Both speaker locations are not facing where your ears usually will be when you’re sitting in any of the front seats. Instead, they take different paths before reaching your ears. Different paths mean different levels and different levels mean unbalanced audio.

Activate Active…ness!
Finally, we get to the actual main topic of this part of the guide: the “Active Front Stage.” To describe it as simple as possible, an active front stage means that each driver is connected solely to one channel of amplification, with no passive crossover filters anywhere, and completely independent of any other speaker in your audio system. Just look how simple it is:
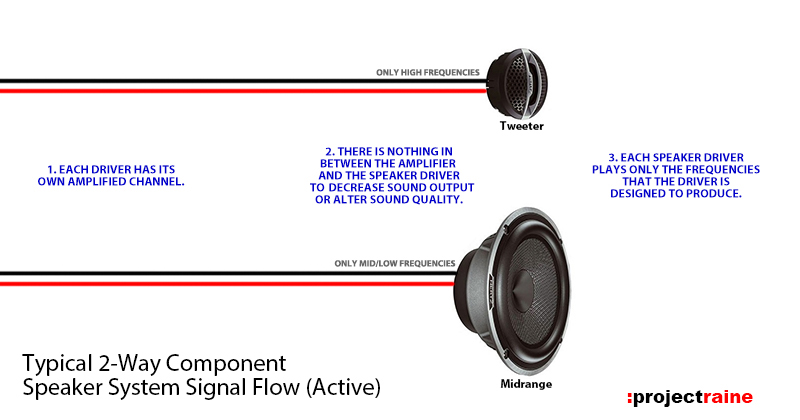
With an active component setup, you can have complete control over what frequency range each driver will play, at what level (how loud) they will play them, and if they will overlap some frequencies or leave a gap of frequencies out. We’re talking granular control where you have the ability to tailor the settings of each individual driver, relative to both the driver location as well as the driver direction, with the intent of combining each individually tuned driver into one sweet-sounding setup. And just like that, you understand why an active setup is great… but now I’m going to also explain why an active component setup can be a pain in the you-know-what as well.
More Channels, Pal
First of all, your hardware has to match; In other words, to run an active front component setup you need not 2, but 4 separate amplifier channels (1 channel per speaker, 4 front speakers in an active configuration = 4 channels required). This means that if you already installed a 4-channel amp to power your front and rear speakers, you don’t have enough to go active unless: A. you dedicate that 4-channel amp to the front channels only and find separate power for the rear speakers, or B. you start shopping for a 6-channel amp to replace it.

You Still Need Some Frequency Control
Second, you’ll need to add some sort of signal processing. Remember how the passive crossovers’ job was to specify only the frequencies that were specific to each driver? When you go active and connect each of the 4 front speakers directly to a basic 4-channel amplifier, there are no crossovers included. All 4 of those speakers will get a full-range amplified signal. Your tweeters will be fed low frequencies it can’t handle (and probably blow out in seconds), and your midrange will be fed high frequencies that it can’t keep up with (and sound really, really bad). You still have to specify which range of frequencies go to each of the front speakers, and you can do this in many ways, such as:
- Aftermarket head unit w/built-in crossover: many head units with RCA outputs have built-in filters that can limit the frequencies going out of each channel;
- An amplifier that has built-in filters: you can buy multi-channel amps that have built-in crossovers/filters as part of the amp itself;
- External manual crossover: a powered crossover that sits in between your head unit and the amplifier, with more extensive frequency control;
- External digital signal processor: a “DSP” that is the ultimate in audio signal tuning, including very advanced crossover functions and time controls.
What Does This Dial Do?
And finally, the part that can really really make things complicated: Many car audio enthusiasts who decided to dive right into an active setup without doing their research first ended up with a stereo system that sounded way worse than it did in a passive setup. This is because they had no idea how to properly use all of these granular controls to correctly get everything set right! They assumed they could just switch to active and their system will automagically sound better! This is not the case.
Going active isn’t a new concept in car audio, but it is an advanced one. If you decide that you want to go beyond a simple passive component system and feel like taking on the challenge of extra fine-tuning to get your audio system sounding as good as it can be, then going active will definitely give you the means to improve the sound even more – but you have to dedicate the time to learn how to properly use all of these granular controls to correctly get everything set right. I mean, what’s the use of having all of these extra adjustments if you have no idea how to use them? What crossover point do you use? High pass, low pass, or bandpass? What about frequency slope? Speaker phase? What? You can easily spend hours and hours fiddling with an active audio system, due to the sheer amount of adjustability you gain by going active. In the early days of car audio, this used to mean renting real-time analyzers and computing time differences with a calculator and so on and so on – lots of labor-intensive tuning.
However lucky for us, these days we are blessed with readily available, incredibly high-tech devices known as DSPs… which we’ll learn about in part 8.

In Part 8 of this series, we’ll look at how we can time travel while sitting still. HINT: Digital technology can be used for great analog results.
Links to All Parts of the Audio Guide
Intro: Your OEM Stereo Sucks.
Part 1: It All Starts With the Source.
Part 2: Speak(er) the Right Way.
Part 3: You Don’t Drive From the Back Seat.
Part 4: Dogs Underwater
Part 5: Less is More
Part 6: More is Less?
Part 7:Separation Anxiety (this post)
Part 8: Time Travel… While Standing Still
Part 9:Partial Means… You’re Not Done
Part 10 Finale: At the End… Here’s 10 (Things to Know)